In modern web applications, it is essential to generate pdf for users. For example, on the e-commerce website, we generate invoice reports, order reports etc. With ASP.NET Core 8, generating PDFs from Razor views is easier than ever, thanks to tools like the NReco PDF generator. In this blog, we’ll go step-by-step through the setup and implementation process, and dive into advanced customization options to add images, styles, tables, and headers to make your PDFs look professional.
Introduction to NReco PDF Generator
The NReco PDF generator is a library built on wkhtmltopdf, which is well-known for rendering HTML into PDFs using Webkit (the same rendering engine as Google Chrome). This tool allows you to convert your Razor views directly into PDFs with minimal setup. It’s great for rendering dynamic content since you can work with HTML and CSS directly within your Razor views.
Step 1: Install NReco.PdfGenerator Packages
You can install NReco.PdfGenerator via the Package Manager Console with this command:
Install-Package NReco.PdfGenerator
Step 2: Create an Interface folder and add the IViewRenderService.cs file

Add the below code in the IViewRenderService.cs file
using Microsoft.AspNetCore.Mvc;

namespace WebApplication1.Interface
{
    public interface IViewRenderService
    {
        Task<string> RenderViewToStringAsync(Controller controller, string viewName, object model);
    }
}
Step 2: Create a Service folder and add the ViewRenderService.cs file

Add the below code in the ViewRenderService.cs file
using Microsoft.AspNetCore.Mvc;
using Microsoft.AspNetCore.Mvc.ViewEngines;
using Microsoft.AspNetCore.Mvc.Rendering;
using Microsoft.AspNetCore.Mvc.ViewFeatures;
using System.IO;
using System.Threading.Tasks;
using WebApplication1.Interface;

namespace WebApplication1.Service
{
    public class ViewRenderService : IViewRenderService
    {

        private readonly ICompositeViewEngine _viewEngine;
        private readonly ITempDataProvider _tempDataProvider;

        public ViewRenderService(ICompositeViewEngine viewEngine, ITempDataProvider tempDataProvider)
        {
            _viewEngine = viewEngine;
            _tempDataProvider = tempDataProvider;
        }

        public async Task<string> RenderViewToStringAsync(Controller controller, string viewPath, object model)
        {
            controller.ViewData.Model = model;

            using var writer = new StringWriter();

            // Use GetView with the full view path
            var viewResult = _viewEngine.GetView(executingFilePath: null, viewPath: viewPath, isMainPage: true);

            if (!viewResult.Success)
            {
                throw new FileNotFoundException($"View '{viewPath}' not found.");
            }

            var viewContext = new ViewContext(
                controller.ControllerContext,
                viewResult.View,
                controller.ViewData,
                controller.TempData,
                writer,
                new HtmlHelperOptions()
            );

            await viewResult.View.RenderAsync(viewContext);
            return writer.ToString();
        }
    }
}
Step 3: Register ViewRenderService in the Program.cs file
builder.Services.AddScoped<IViewRenderService, ViewRenderService>();Step 4: Create the Reports Controller and add the below code
using Microsoft.AspNetCore.Mvc;
using NReco.PdfGenerator;
using System.Threading.Tasks;
using WebApplication1.Interface;

namespace WebApplication1.Controllers
{

    public class ReportsController : Controller
    {
        private readonly IViewRenderService _viewRenderService;

        public ReportsController(IViewRenderService viewRenderService)
        {
            _viewRenderService = viewRenderService;
        }

        public async Task<IActionResult> GeneratePdf()
        {
            // Render the Razor view to HTML
            string htmlContent = await _viewRenderService.RenderViewToStringAsync(this, "/Views/Reports/ReportView.cshtml", null);

            // Generate PDF from the HTML content
            var pdfBytes = (new NReco.PdfGenerator.HtmlToPdfConverter()).GeneratePdf(htmlContent);

            // Return PDF as downloadable file
            return File(pdfBytes, "application/pdf", "Report.pdf");
        }
    }
}
Step 5: Set Up the Razor View for PDF Content
Create a Razor view specifically for the PDF content. For example, let’s create a view called ReportView.cshtml inside a folder named Views/Reports/.
<!-- Views/Reports/ReportView.cshtml -->
@{
    Layout = null;
}

<!DOCTYPE html>
<html>
<head>
    <style>
        body {
            font-family: Arial, sans-serif;
        }

        h1 {
            color: navy;
            text-align: center;
        }

        p, table {
            width: 100%;
            font-size: 14px;
        }

        table, th, td {
            border: 1px solid #ddd;
            border-collapse: collapse;
            padding: 8px;
            text-align: left;
        }

        th {
            background-color: #f2f2f2;
        }
    </style>
</head>
<body>

    <h1>Monthly Sales Report</h1>
    <p>This is a dynamically generated PDF report.</p>

    <h2>Sales Data</h2>
    <table>
        <tr>
            <th>Product</th>
            <th>Quantity</th>
            <th>Price</th>
        </tr>
        <tr>
            <td>Product 1</td>
            <td>10</td>
            <td>$50</td>
        </tr>
        <tr>
            <td>Product 2</td>
            <td>5</td>
            <td>$30</td>
        </tr>
    </table>

</body>
</html>
Step 6: Testing the PDF Generation
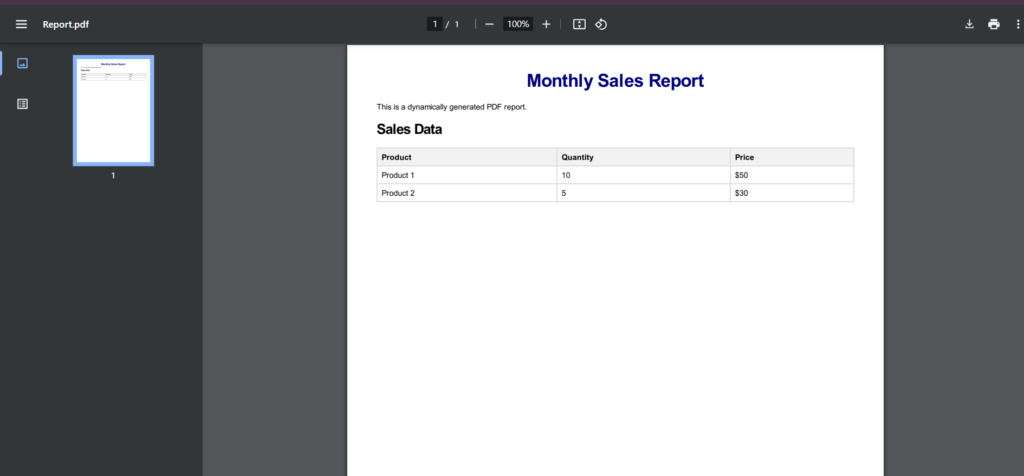
Run your application and navigate to the GeneratePdf action endpoint (e.g., /Reports/GeneratePdf). This should trigger the PDF generation based on the content of the ReportView.cshtml.

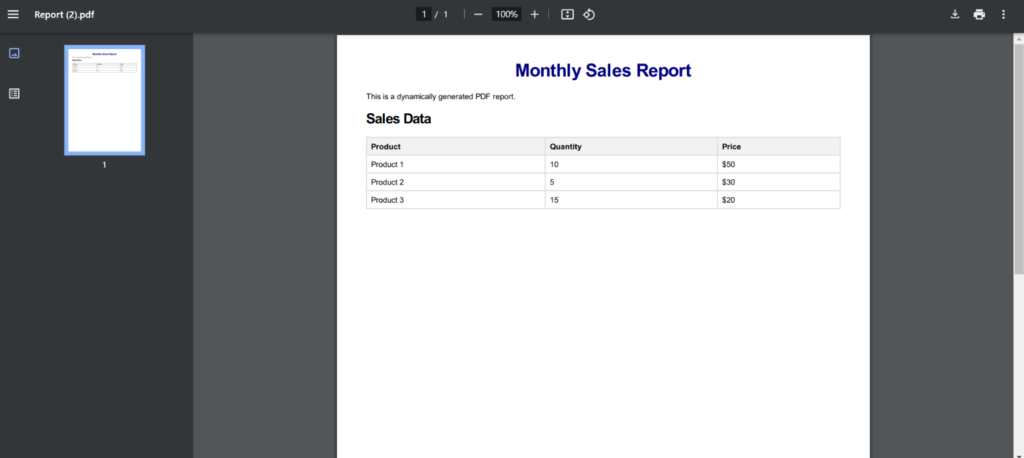
You can see that a beautiful PDF is generated with minimal effort. However, this PDF is static. In a modern web application, we need to create dynamic PDFs for users. So let’s develop a dynamic PDF.
To generate the PDF with dynamic data, we can pass a model containing the product details from the controller to the view. Here’s how to set up a model, modify the view to use it, and update the controller to pass data dynamically.
Step 1: Create a Model for Product Data
Define a model class to represent the products you want to display in the PDF. Here’s an example:
 // Models/Product.cs

namespace WebApplication1.Models
{
    public class Product
    {
        public string Name { get; set; }
        public int Quantity { get; set; }
        public decimal Price { get; set; }
    }

    public class ReportViewModel
    {
        public string ReportTitle { get; set; }
        public List<Product> Products { get; set; }
    }
}
In this example, ReportViewModel contains a ReportTitle and a list of Product objects.
Step 2: Modify the Razor View to Use Dynamic Data
Update ReportView.cshtml to use the ReportViewModel and display each product’s data dynamically.
<!-- Views/Reports/ReportView.cshtml -->

@{
    Layout = null;
}

@model ReportViewModel

<!DOCTYPE html>
<html>
<head>
    <style>
        body {
            font-family: Arial, sans-serif;
        }

        h1 {
            color: navy;
            text-align: center;
        }

        p, table {
            width: 100%;
            font-size: 14px;
        }

        table, th, td {
            border: 1px solid #ddd;
            border-collapse: collapse;
            padding: 8px;
            text-align: left;
        }

        th {
            background-color: #f2f2f2;
        }
    </style>
</head>
<body>
    <h1>@Model.ReportTitle</h1>
    <p>This is a dynamically generated PDF report.</p>

    <h2>Sales Data</h2>
    <table>
        <tr>
            <th>Product</th>
            <th>Quantity</th>
            <th>Price</th>
        </tr>
        @foreach (var product in Model.Products)
        {
            <tr>
                <td>@product.Name</td>
                <td>@product.Quantity</td>
                <td>$@product.Price</td>
            </tr>
        }
    </table>
</body>
</html>
Step 3: Update the Controller to Pass Data to the View
Modify the GeneratePdf action in ReportsController to create a list of products, populate the ReportViewModel, and pass it to the view.
public async Task<IActionResult> GeneratePdf()
{
    // Sample data for demonstration
    var products = new List<Product>
    {
        new Product { Name = "Product 1", Quantity = 10, Price = 50 },
        new Product { Name = "Product 2", Quantity = 5, Price = 30 },
        new Product { Name = "Product 3", Quantity = 15, Price = 20 }
    };

    var model = new ReportViewModel
    {
        ReportTitle = "Monthly Sales Report",
        Products = products
    };

    // Render the Razor view to HTML, passing the model
    string htmlContent = await _viewRenderService.RenderViewToStringAsync(this, "/Views/Reports/ReportView.cshtml", model);

    // Generate PDF from the HTML content
    var pdfBytes = (new NReco.PdfGenerator.HtmlToPdfConverter()).GeneratePdf(htmlContent);

    // Return PDF as downloadable file
    return File(pdfBytes, "application/pdf", "Report.pdf");
}

Conclusion
This approach keeps the MVC structure intact by generating PDFs directly from Razor views, allowing for better separation of concerns and easier maintainability. By following these steps, you can create polished, professional PDFs with custom styling, headers, and data tables directly from Razor views.

