Every software development uses a database, so working with a database is very important. In Entity Framework Core, there are two main ways to interact with a database: Code First and Database First(Reverse Engineering). In the Code First approach, you need to design models first, and then a database is generated from the models. The Database First approach works in the opposite direction. In this blog, we will dive deep into reverse engineering, where you start with an existing database and generate code (models) from it.
What is Reverse Engineering in Entity Framework Core?
Reverse engineering in Entity Framework Core allows developers to generate C# classes (models) from an existing database schema. This process creates entity classes and a context class based on tables, views, and relationships present in the database. It’s particularly useful when you’re working on a legacy system or a project where the database already exists, and you need to integrate it into your application.
Let’s understand with an example
First, we need to create a database with a table. We create an Employee table for demonstration in SQL Server. Here is an example of how to create an Employee table.
CREATE DATABASE EmployeeDB;
GO

USE EmployeeDB;
GO

CREATE TABLE Employee
(
    EmployeeId INT PRIMARY KEY IDENTITY(1,1),
    FirstName NVARCHAR(50) NOT NULL,
    LastName NVARCHAR(50) NOT NULL,
    Designation  NVARCHAR(50) NOT NULL
);
Now, we have a database with an Employee table. We create a .net project to perform reverse engineering.
Step 1: Create a New .NET Project
I am using Microsoft Visual Studio Community 2022 for the demo. Let’s create a new ASP.NET Core Web app(Model-View-Controller) using the .Net 8.0 framework.

Step 2: Install Required Packages
Install Entity Framework Core via NuGet
1) Open your .NET project in Visual Studio.
2) Go to Tools > NuGet Package Manager > Package Manage Console.
3) Use the following command in the NuGet Package Manager Console:
Install-Package Microsoft.EntityFrameworkCore.SqlServer
Install-Package Microsoft.EntityFrameworkCore.Tools
Microsoft.EntityFrameworkCore.SqlServer: This package allows EF Core to work with SQL Server databases.
Microsoft.EntityFrameworkCore.Tools: This package provides the tools needed to scaffold the database.
Step 3: Use the Scaffold-DbContext Command
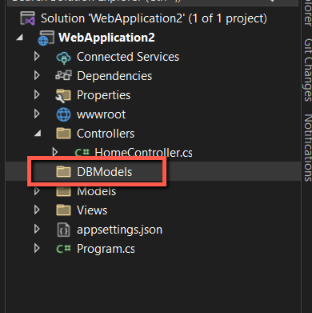
Based on your existing database, the Scaffold-DbContext command generates C# models and a DbContext class. First, we create a DBModels folder in the solution for C# models and a DbContext class.

Now, we add connection string details in the appsettings.json file.
{
  "Logging": {
    "LogLevel": {
      "Default": "Information",
      "Microsoft.AspNetCore": "Warning"
    }
  },
  "ConnectionStrings": {
    "DefaultConnection": "Data Source=YOUR_SERVER_NAME;Initial Catalog=EmployeeDB;User Id=SQL_SERVER_USERID;Password=SQL_SERVER_PASSWORD;TrustServerCertificate=True;"
  },
  "AllowedHosts": "*"
}
Now we run the below command in the Package Manager Console to reverse engineer the EmployeeDB database:
Scaffold-DbContext “Name=ConnectionStrings:DefaultConnection” Microsoft.EntityFrameworkCore.SqlServer -o DBModels
When you run this command, Entity Framework Core will automatically generate classes that represent your database schema.
Step 4: Review the Generated Files

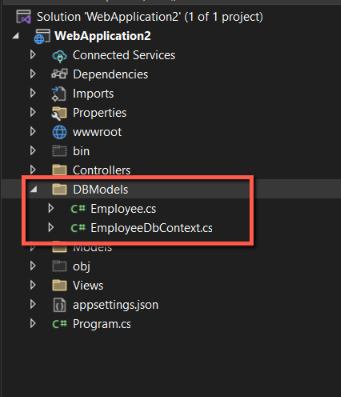
After running the command, you’ll see that two types of files are generated in the DBModels folder:
- DbContext Class: This class represents your database connection and provides methods to query and save data to the database.
- Entity Classes: For each table in your database, an entity class is generated. In our case, an Employee class will be created.
Here’s an example of what the generated Employee class might look like:
public partial class Employee
{
    public int EmployeeId { get; set; }

    public string FirstName { get; set; } = null!;

    public string LastName { get; set; } = null!;

    public string Designation { get; set; } = null!;
}
This class maps to the Employees table in the database, with each property corresponding to a column in the table.
The DbContext class might look something like this:
public partial class EmployeeDbContext : DbContext
{
    public EmployeeDbContext()
    {
    }

    public EmployeeDbContext(DbContextOptions<EmployeeDbContext> options)
        : base(options)
    {
    }

    public virtual DbSet<Employee> Employees { get; set; }

    protected override void OnConfiguring(DbContextOptionsBuilder optionsBuilder)
        => optionsBuilder.UseSqlServer("Name=ConnectionStrings:DefaultConnection");

    protected override void OnModelCreating(ModelBuilder modelBuilder)
    {
        modelBuilder.Entity<Employee>(entity =>
        {
            entity.HasKey(e => e.EmployeeId).HasName("PK__Employee__7AD04F1122DE3112");

            entity.ToTable("Employee");

            entity.Property(e => e.Designation).HasMaxLength(50);
            entity.Property(e => e.FirstName).HasMaxLength(50);
            entity.Property(e => e.LastName).HasMaxLength(50);
        });

        OnModelCreatingPartial(modelBuilder);
    }

    partial void OnModelCreatingPartial(ModelBuilder modelBuilder);
}
This EmployeeDbContext class is your entry point for interacting with the database. It contains a DbSet<Employee> property that allows you to query and save Employee records.
Now, we need to Register the EmployeeDbContext in the program.cs file.
using Microsoft.EntityFrameworkCore;
using WebApplication2.DBModels;

var builder = WebApplication.CreateBuilder(args);

// Add services to the container
builder.Services.AddControllersWithViews();

// Register the EmployeeDbContext with the Dependency Injection (DI) container
builder.Services.AddDbContext<EmployeeDbContext>(options =>
{
    // Configure the DbContext to use SQL Server as the database provider
    // The connection string is fetched from the configuration file (appsettings.json) using the key       "DefaultConnection"

    options.UseSqlServer(builder.Configuration.GetConnectionString("DefaultConnection"));
});

var app = builder.Build();

// Configure the HTTP request pipeline.
if (!app.Environment.IsDevelopment())
{
    app.UseExceptionHandler("/Home/Error");
    app.UseHsts();
}

app.UseHttpsRedirection();
app.UseStaticFiles();

app.UseRouting();

app.UseAuthorization();

app.MapControllerRoute(
    name: "default",
    pattern: "{controller=Home}/{action=Index}/{id?}");

app.Run();
Step 5: Use the Generated Models in Your Project
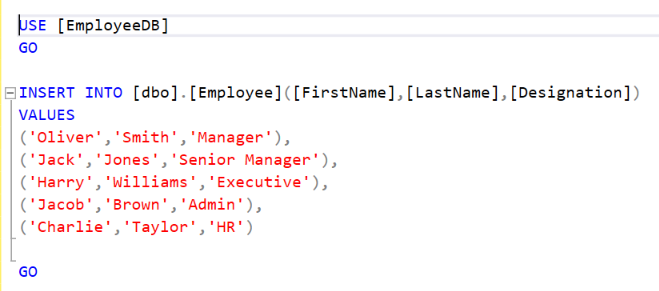
Once the models and DbContext have been generated, you can start using them in your project. Here is the query to add some records to the employee table.

Now, we will use the home controller to fetch all employee records.
public class HomeController : Controller
{
    private readonly EmployeeDbContext dbContext;

    public HomeController(EmployeeDbContext dbContext)
    {
        this.dbContext = dbContext;
    }

    public IActionResult Index()
    {
        var empList = dbContext.Employees.ToList();
        return View(empList);
    }

    public IActionResult Privacy()
    {
        return View();
    }

}
We need to add a view to display all employees.
@model IEnumerable<WebApplication2.DBModels.Employee>
@{
    ViewData["Title"] = "Home Page";
}

<div class="text-center">

    <table class="table">
        <thead>
            <tr>
                <th>Employee ID</th>
                <th>First Name</th>
                <th>Last Name</th>
                <th>Designation</th>
            </tr>
        </thead>
        @foreach (var item in Model)
        {
            <tr>
                <td>@item.EmployeeId</td>
                <td>@item.FirstName</td>
                <td>@item.LastName</td>
                <td>@item.Designation</td>
            </tr>
        }
    </table>
</div>
Now, when you run the project you will see below output.

Benefits of Reverse Engineering
Using reverse engineering in Entity Framework Core provides several benefits:
- Time-saving: When working with an existing database, reverse engineering generates all the necessary code automatically, saving you the time it would take to write models and DbContext manually.
- Consistency: The generated code closely reflects your database schema, reducing the chance of errors or inconsistencies between the database and your code.
- Easy Integration: Reverse engineering makes it easier to integrate existing databases into your .NET projects, especially when working on legacy systems.

